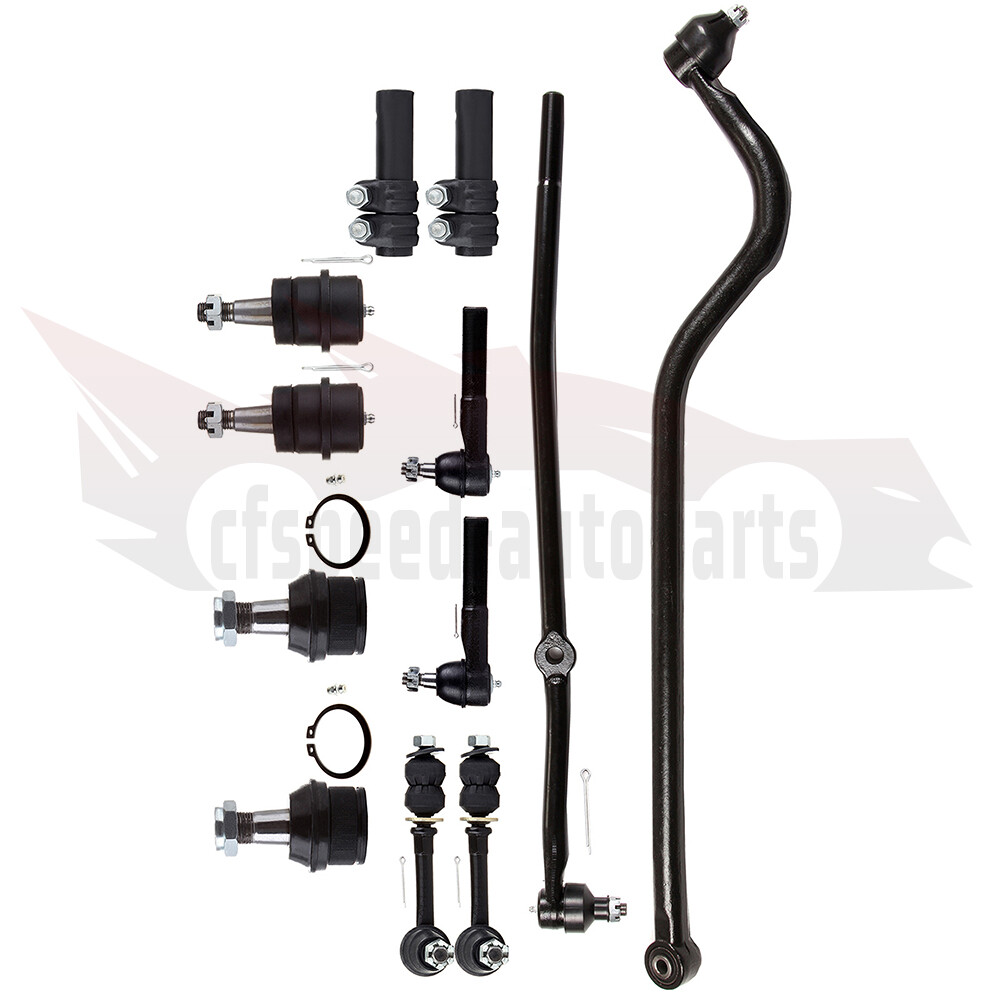
8PCS Front Tie Rod Links Ball Joints Sway Bar Links Kit For Jeep Liberty 2006 07
$ 28.85
Description
1.Fit For: 2006-2007 Jeep Liberty 2.Package Includes: 1x Part # Front Left Outer Tie Rod Ends - ES3535 1x Part # Front Right Outer Tie Rod Ends - ES3536 2x Part # Front Lower Ball Joints - K80767 2x Part # Front Inner Tie Rod Ends - EV800416 2x Part # Front Stabilizer Bar Link - K7391 3.Note Although some parts have grease fittings, other parts are factory sealed, but do not affect the fit and quality of the parts. 10 Year Warranty Please check above compatibility list to make sure it fits your vehicle. Ball Joint Cfspeed-autoparts 8PCS Front Tie Rod Links Ball Joints Sway Bar Links Kit For Jeep Liberty 2006 07 1.Fit For: 2006-2007 Jeep Liberty 2.Package Includes: 1x Part # Front Left Outer Tie Rod Ends - ES3535 1x Part # Front Right Outer Tie Rod Ends - ES3536 2x Part # Front Lower Ball Joints - K80767 2x Part # Front Inner Tie Rod Ends - EV800416 2x Part # Front Stabilizer Bar Link - K7391 3.Note Although some parts have grease fittings, other parts are factory sealed, but do not affect the fit and quality of the parts. 10 Year Warranty Please check above compatibility list to make sure it fits your vehicle. Ball Joint Ball joints may be grouped into two classifications, load carrying and non-load carrying. Ball joints may be manufactured with forged, stamped, cold-formed, or screw-machined housings. The coil spring is seated on the control arm to which the load-carrying ball joint is attached. For example, when the coil spring is mounted between the lower control arm and the chassis, the lower ball joint is a load-carrying joint. In a torsion bar suspension, the load-carrying ball joint is mounted on the control arm to which the torsion bar is attached. A load-carrying ball joint supports the vehicle weight. Tie-Rod End Replacement Guideline: If you feel a bump in the steering when driving over road bumps or curbs, this might be due to worn tie rod ends or inner tie rods. Clicking noises during sudden steering movements can also be symptoms of a defective tie rod. In order to determine the exact cause and replace the defective tie rod, the car must be elevated with a vehicle lift in order to be examined more closely. This useful tip applies to the exchange of tie rod ends and inner tie rods, which together form the so-called tie rod. Picture(A) Note: Cleanliness is extremely important when working on the power steering. Incorrect work and contamination can lead to leakage and, in the worst case, to failure of the steering assistance. 1.Lift the vehicle and dismount the front axle wheels. 2.Spray the fastening nut of the tie rod end with rust remover and leave it on for a few minutes. Picture(B) 3.Dismount the front underride guard. Picture(C) 4.Loosen the fastening nut from the tie rod and remove it completely. 5.Remove the tie rod end from the steering knuckle using an appropriate ball joint separator. Picture(D) 6.Remove the clamp of the bellow on the steering gear. 7.Push the bellow towards the tie rod end. Picture(E) 8.Unscrew the inner tie rod from the rack. 9.Clean the sealing face of the bellow at the steering gear. Picture(F) 10.Clean the lug of the rubber contact surface of the ball joint in the steering knuckle. Note:Always use new self-locking nuts and bolts for a reliable repair. 11.Screw the new inner tie rod into the rack and tighten it with the tightening torque that has been specified by the vehicle manufacturer. Picture(G) 12.Mount the bellow and close the clamps with the appropriate special tool. Note:Incorrect mounting of the bellow can lead to corrosion of the rack: the steering gear starts leaking which can lead to a failure in the steering assistance. Picture(H) 13.Secure the ball joint in the steering knuckle and mount the nut. Please observe the tightening torque suggested by the vehicle manufacturer. Note:During mounting, the ball stud should not turn within the ball joint. This can cause damage inside the ball joint and can lead to early failure. Tip:Secure the ball stud against twisting with a suitable tool. Picture(I) 14.Mount the front underride guard. 15.Mount the front wheels and tighten them with the tightening torque recommended by the vehicle manufacturer. 16.Align the wheels and adjust them if necessary. Observe the vehicle manufacturer specifications. 17.Perform a test drive. Note:When performing the test drive, pay special attention to the handling while cornering and listen for possible noise emission. Sway Bar Stabilizer Link Replacement Guideline: While driving, the following signs may indicate a faulty sway bar stabilizer link: (1).Rattling and thumping noises on rough roads. (2).Imprecise vehicle handling. (3).Stronger inclination of the vehicle during cornering. If the sway bar stabilizer link is found to be defective, it should be replaced as described below. Picture(A) 1.Raise vehicle and remove front wheels. Tip:Always check both stabilizer links and replace them in pairs if necessary. 2.Spray fastening nuts of the stabilizer link with rust remover and let act for a few minutes. Picture(B) 3.Loosen the lower fastening nut of the stabilizer link at the stabilizer and remove. Tip:If the ball stud also starts to turn, hold it with a suitable tool. 4.Press stabilizer link out of torsion bar. Picture(C) 5.Loosen the upper fastening nut of the stabilizer link at the suspension strut and remove it. Tip:If the ball stud also starts to turn, hold it with a suitable tool. Picture(D) 6.Press stabilizer link at suspension strut out of bracket. Picture(E) 7.Insert new stabilizer link at suspension strut. Picture(F) 8.Tighten stabilizer link at suspension strut to the tightening torque specified by the vehicle manufacturer. Tip:Secure the ball stud against twisting with a suitable tool. Picture(G) 9.Insert new stabilizer link at stabilizer. 10.Tighten stabilizer link at stabilizer to the tightening torque specified by the vehicle manufacturer. Tip:Secure the ball stud against twisting with a suitable tool. Picture(H) 11.Remount the front wheels. Lower the vehicle and tighten the wheel studs to the tightening torque specified by the vehicle manufacturer. Tip:Even if replacing the stabilizer link does not directly affect the chassis setting, we recommend checking the axle setting and adjusting if necessary after working on the suspension. 12.Conclude with a test drive. Ball Joint Replacement Guideline: If there is a knocking or clunking noise in the area of the front axle when the car is traveling over road bumps, potholes or curbs, then there is usually a defect in a component of the wheel suspension. Picture(A) The side of the front axle from which the (vibration) noise is emanating can already be determined during a test drive. The type of noise also already provides certain indications for maintenance regarding which components might be faulty. Picture(B) 1.Raise the vehicle and remove the front wheels. 2.To loosen the fastening screws and fixing nuts of the compression ball joint more easily, spray them with rust remover and allow to act for a few minutes. Picture(C) 3.Loosen the fastening screws of the broken ball joint on the control arm and remove the nuts. Picture(D) 4.Loosen and remove the fixing nut of the ball joint on the steering knuckle. Tip:If the ball stud rotates, hold the ball stud in place with a hexagon socket. Picture(E) 5.Remove the bad or worn ball joint from the control arm. 6.Loosen the compression ball joint on the steering knuckle using a suitable special tool. Picture(F) 7.Clean the cone connection. Tip:For better sealing and durability of the ball joint sleeve, a little silicone grease can be applied to the contact surface. Picture(G) 8.Insert new compression ball joint in the control arm and steering knuckle and tighten with new fixing nuts. 9.Reinstall front wheels. Lower the vehicle and tighten the wheel studs to the tightening torque specified by the vehicle manufacturer. 10.Measure the chassis and adjust it using the various holes on the compression ball joint if necessary. 11.Finally, carry out a test drive. Frequently Asked Questions (1).How will I know that I have to renew my ball joint parts? Or replace them? If your ball joint fails, you will listen to a strange sound while driving. And that sound may help you to realize that your ball joint has failed and you have to renew them. (2).What happens if a ball joint breaks? When a ball joint breaks, you will hear a mysterious noise inside your car wheel. Your car tire will wear-out since your alignment will be broken, and you will feel the car getting out of control. If the ball joint breaks completely, it can be separated, and things can turn sour quickly. The wheel will stop being nice and can even steer you off the road. It can be serious. Broken ball joints will seriously affect the steering and suspension. It can even result in your wheel falling off the car. (3).Are worn ball joints dangerous? Yes, it can be quite dangerous. Because, a worn ball joint causes suspension damage, inspection failure, and breakage of related parts. It might make your front suspension come apart while driving, so the wheels move in whatever direction inertia takes them. That can lead to a fatal accident. (4).What happens if I don't replace ball joints? If you don't want to replace your ball joints, then get ready to experience some serious issues. The old ball joints cause mysterious clunking noise or drifting steering. Once they are worn-out, it will seriously affect your steering and suspension. However, you do not need to change the ball joints if it is new. (5).Do I need to grease new ball joints? I would say it will be a wise decision if you grease your new ball joints. At least I will always grease a new one after the installation. Greasing a new ball joint will make it stronger and extend its lifetime because there is a minimal amount of grease inside. I suggest you do so after the first installation. Follow the instruction card. Item Specifics Placement on Vehicle Front Left Right Lower Type Sway Bar Link Universal Fitment No Items Included Mounting Hardware Custom Bundle Yes Interchange Part Number ES3535 ES3536 K7391 EV800416 K80767 OE/OEM Part Number Suspension Steering Tie Rod Ends Linkages Assembly Superseded Part Number Front Driver and Passenger Side Replacement Manufacturer Warranty 10 Year Brand cfspeed-autoparts Manufacturer Part Number C81405101CPS Greasable or Sealed Greasable Modified Item Yes OE Spec or Performance/Custom OE Spec Surface Finish Polished, Rust Protected Quantity 8 Pcs Kit Parts Included Ball Joint, Outer Tie Rod, Inner Tie Rod, Sway Bar Cross Part Number 5072445AA, 52128521AA 5072444AA, 52128520AA Cross part number 5069161AA, 5069161AB, 5110437AA,52109970AA, 52088662AB Features Greasable Finish Coated Material Alloy Steel Mounting Style Bolt-On Cotter Pin Hole Yes Payment Payments are expected within 7 days after the last winning auction is closed; Otherwise Unpaid Item Dispute will be filed with eBay. Shipping Product will be shipped within 2 business days after full payment is received and verified. Delivery Time is about 3-7 business days to most of countries. All domestic orders will be shipped via USPS, UPS or FedEx from our US warehouse and usually arrives to your door in about 3-5 business days. We ship the package to your shipping address in eBay instead of the one in PayPal. Please tell us your shipping address if it is different from the one in eBay. The tracking number will be given for the customer to check the shipping status online (registered or faster service only). We are not responsible for any wrong or undeliverable addresses. Please verify and update your shipping address on eBay during checkout. Returns MoneyBackOrExchange We stand behind every product we sell. All of our brand new items come with a 30-Days money-back guarantee. We define the item as defective only if it doesn't function as described. It is the buyer's responsibility to understand the item description before bidding. Contact Us We are dedicated to provide high quality products and satisfied customer service to our sincerely customers, so if there's any questions or problems with our products or service, feel free to contact us please. Cfspeed-autoparts DESCRIPTION PAYMENT SHIPPING RETURN POLICY CONTACT US Shop Category Store Home Suspension Parts ◈ Air Strut Assembly ◈ Air Spring ◈ Air Suspension Compressor ◈ Solenoid Valve Block ◈ Truck & Trailer Springs Truck & Trailer Springs Vehicles ◈ Audi ◈ Bentley ◈ BMW ◈ Buick ◈ Cadillac ◈ Chevrolet ◈ Citroen ◈ Dodge ◈ Ford ◈ GMC ◈ Hyundai ◈ Infiniti ◈ Isuzu ◈ Jaguar ◈ Jeep ◈ Land Rover ◈ Lexus ◈ Lincoln ◈ Mercedes-Benz ◈ Mercury ◈ Oldsmobile ◈ Porsche ◈ Saab ◈ Toyota ◈ Volkswagen Suspension Kits Air suspension valves solenoid Shocks & Struts Struts & Suspension Kit & Hubs coilovers complete strut Brake System Parts ◈ Brake Calipers ◈ Brake Drums & Brake Shoes ◈ Brake Pads & Brake Shoes Lift Supports Bumper Assembly Steering Knuckle Mass Air Flow Sensor Strut Mount air dryer Power Brake Booster trim tilt motor Removal Tool Control Arm Camber Arm dipstick Cylinder Piston Kit snorkel air intake Ballast Module Horns & Sirens Mud Flaps Protection Shield & Lift Kit Coil Springs Clock Spring Radius Arm Other Hot Item Rear Pair Air Suspension Air Spring For Lincoln Town Car Mercury Grand Marquis USD 66.58 Pair Front Left and Right Shock Strut Assembly For Chevrolet Equinox GMC Terrain USD 61.95 For 07-2012 Nissan Versa Front Struts Lower Control Arm Tierod Sway Bars 10pcs USD 163.07 For 2011-2016 Hyundai Elantra Front Struts Tie Rods Sway Bar Suspension Kits USD 180.72 For Chevy Silverado GMC Sierra 1500 Front Struts Control Arm Ball Joint Tie Rod USD 245.77 Picture New List Item 10PCS Ball Joint Tie Rod End Wheel Bearning Hub For 2006-2008 GMC Canyon USD 179.48 2PCS Front Steering Inner Tie Rod End For Toyota Tacoma 2005-2018 EV800529 USD 30.79 Pair Front Complete Strut & Coil Spring Assembly For Kia Sorento 2011-2013 USD 133.74 10PCS Front Lower Tie Rod Wheel Bearning For 2007-2017 Jeep Patriot Compass USD 116.26 6x Front Control Arm with Ball Joint Wheel Bearning Hub For 06-10 Dodge Charger USD 147.03 Help & Info Payment Policy Shipping Policy Return Policy FAQ About Us 8PCS Front Tie Rod Links Ball Joints Sway Bar Links Kit For Jeep Liberty 2006 07 1.Fit For: 2006-2007 Jeep Liberty 2.Package Includes: 1x Part # Front Left Outer Tie Rod Ends - ES3535 1x Part # Front Right Outer Tie Rod Ends - ES3536 2x Part # Front Lower Ball Joints - K80767 2x Part # Front Inner Tie Rod Ends - EV800416 2x Part # Front Stabilizer Bar Link - K7391 3.Note Although some parts have grease fittings, other parts are factory sealed, but do not affect the fit and quality of the parts. 10 Year Warranty Please check above compatibility list to make sure it fits your vehicle. Ball Joint Ball joints may be grouped into two classifications, load carrying and non-load carrying. Ball joints may be manufactured with forged, stamped, cold-formed, or screw-machined housings. The coil spring is seated on the control arm to which the load-carrying ball joint is attached. For example, when the coil spring is mounted between the lower control arm and the chassis, the lower ball joint is a load-carrying joint. In a torsion bar suspension, the load-carrying ball joint is mounted on the control arm to which the torsion bar is attached. A load-carrying ball joint supports the vehicle weight. Tie-Rod End Replacement Guideline: If you feel a bump in the steering when driving over road bumps or curbs, this might be due to worn tie rod ends or inner tie rods. Clicking noises during sudden steering movements can also be symptoms of a defective tie rod. In order to determine the exact cause and replace the defective tie rod, the car must be elevated with a vehicle lift in order to be examined more closely. This useful tip applies to the exchange of tie rod ends and inner tie rods, which together form the so-called tie rod. Picture(A) Note: Cleanliness is extremely important when working on the power steering. Incorrect work and contamination can lead to leakage and, in the worst case, to failure of the steering assistance. 1.Lift the vehicle and dismount the front axle wheels. 2.Spray the fastening nut of the tie rod end with rust remover and leave it on for a few minutes. Picture(B) 3.Dismount the front underride guard. Picture(C) 4.Loosen the fastening nut from the tie rod and remove it completely. 5.Remove the tie rod end from the steering knuckle using an appropriate ball joint separator. Picture(D) 6.Remove the clamp of the bellow on the steering gear. 7.Push the bellow towards the tie rod end. Picture(E) 8.Unscrew the inner tie rod from the rack. 9.Clean the sealing face of the bellow at the steering gear. Picture(F) 10.Clean the lug of the rubber contact surface of the ball joint in the steering knuckle. Note:Always use new self-locking nuts and bolts for a reliable repair. 11.Screw the new inner tie rod into the rack and tighten it with the tightening torque that has been specified by the vehicle manufacturer. Picture(G) 12.Mount the bellow and close the clamps with the appropriate special tool. Note:Incorrect mounting of the bellow can lead to corrosion of the rack: the steering gear starts leaking which can lead to a failure in the steering assistance. Picture(H) 13.Secure the ball joint in the steering knuckle and mount the nut. Please observe the tightening torque suggested by the vehicle manufacturer. Note:During mounting, the ball stud should not turn within the ball joint. This can cause damage inside the ball joint and can lead to early failure. Tip:Secure the ball stud against twisting with a suitable tool. Picture(I) 14.Mount the front underride guard. 15.Mount the front wheels and tighten them with the tightening torque recommended by the vehicle manufacturer. 16.Align the wheels and adjust them if necessary. Observe the vehicle manufacturer specifications. 17.Perform a test drive. Note:When performing the test drive, pay special attention to the handling while cornering and listen for possible noise emission. Sway Bar Stabilizer Link Replacement Guideline: While driving, the following signs may indicate a faulty sway bar stabilizer link: (1).Rattling and thumping noises on rough roads. (2).Imprecise vehicle handling. (3).Stronger inclination of the vehicle during cornering. If the sway bar stabilizer link is found to be defective, it should be replaced as described below. Picture(A) 1.Raise vehicle and remove front wheels. Tip:Always check both stabilizer links and replace them in pairs if necessary. 2.Spray fastening nuts of the stabilizer link with rust remover and let act for a few minutes. Picture(B) 3.Loosen the lower fastening nut of the stabilizer link at the stabilizer and remove. Tip:If the ball stud also starts to turn, hold it with a suitable tool. 4.Press stabilizer link out of torsion bar. Picture(C) 5.Loosen the upper fastening nut of the stabilizer link at the suspension strut and remove it. Tip:If the ball stud also starts to turn, hold it with a suitable tool. Picture(D) 6.Press stabilizer link at suspension strut out of bracket. Picture(E) 7.Insert new stabilizer link at suspension strut. Picture(F) 8.Tighten stabilizer link at suspension strut to the tightening torque specified by the vehicle manufacturer. Tip:Secure the ball stud against twisting with a suitable tool. Picture(G) 9.Insert new stabilizer link at stabilizer. 10.Tighten stabilizer link at stabilizer to the tightening torque specified by the vehicle manufacturer. Tip:Secure the ball stud against twisting with a suitable tool. Picture(H) 11.Remount the front wheels. Lower the vehicle and tighten the wheel studs to the tightening torque specified by the vehicle manufacturer. Tip:Even if replacing the stabilizer link does not directly affect the chassis setting, we recommend checking the axle setting and adjusting if necessary after working on the suspension. 12.Conclude with a test drive. Ball Joint Replacement Guideline: If there is a knocking or clunking noise in the area of the front axle when the car is traveling over road bumps, potholes or curbs, then there is usually a defect in a component of the wheel suspension. Picture(A) The side of the front axle from which the (vibration) noise is emanating can already be determined during a test drive. The type of noise also already provides certain indications for maintenance regarding which components might be faulty. Picture(B) 1.Raise the vehicle and remove the front wheels. 2.To loosen the fastening screws and fixing nuts of the compression ball joint more easily, spray them with rust remover and allow to act for a few minutes. Picture(C) 3.Loosen the fastening screws of the broken ball joint on the control arm and remove the nuts. Picture(D) 4.Loosen and remove the fixing nut of the ball joint on the steering knuckle. Tip:If the ball stud rotates, hold the ball stud in place with a hexagon socket. Picture(E) 5.Remove the bad or worn ball joint from the control arm. 6.Loosen the compression ball joint on the steering knuckle using a suitable special tool. Picture(F) 7.Clean the cone connection. Tip:For better sealing and durability of the ball joint sleeve, a little silicone grease can be applied to the contact surface. Picture(G) 8.Insert new compression ball joint in the control arm and steering knuckle and tighten with new fixing nuts. 9.Reinstall front wheels. Lower the vehicle and tighten the wheel studs to the tightening torque specified by the vehicle manufacturer. 10.Measure the chassis and adjust it using the various holes on the compression ball joint if necessary. 11.Finally, carry out a test drive. Frequently Asked Questions (1).How will I know that I have to renew my ball joint parts? Or replace them? If your ball joint fails, you will listen to a strange sound while driving. And that sound may help you to realize that your ball joint has failed and you have to renew them. (2).What happens if a ball joint breaks? When a ball joint breaks, you will hear a mysterious noise inside your car wheel. Your car tire will wear-out since your alignment will be broken, and you will feel the car getting out of control. If the ball joint breaks completely, it can be separated, and things can turn sour quickly. The wheel will stop being nice and can even steer you off the road. It can be serious. Broken ball joints will seriously affect the steering and suspension. It can even result in your wheel falling off the car. (3).Are worn ball joints dangerous? Yes, it can be quite dangerous. Because, a worn ball joint causes suspension damage, inspection failure, and breakage of related parts. It might make your front suspension come apart while driving, so the wheels move in whatever direction inertia takes them. That can lead to a fatal accident. (4).What happens if I don't replace ball joints? If you don't want to replace your ball joints, then get ready to experience some serious issues. The old ball joints cause mysterious clunking noise or drifting steering. Once they are worn-out, it will seriously affect your steering and suspension. However, you do not need to change the ball joints if it is new. (5).Do I need to grease new ball joints? I would say it will be a wise decision if you grease your new ball joints. At least I will always grease a new one after the installation. Greasing a new ball joint will make it stronger and extend its lifetime because there is a minimal amount of grease inside. I suggest you do so after the first installation. Follow the instruction card. Item Specifics Placement on Vehicle : Front Left Right Lower Type : Sway Bar Link Universal Fitment : No Items Included : Mounting Hardware Custom Bundle : Yes Interchange Part Number : ES3535 ES3536 K7391 EV800416 K80767 OE/OEM Part Number : Suspension Steering Tie Rod Ends Linkages Assembly Superseded Part Number : Front Driver and Passenger Side Replacement Manufacturer Warranty : 10 Year Brand : cfspeed-autoparts Manufacturer Part Number : C81405101CPS Greasable or Sealed : Greasable Modified Item : Yes OE Spec or Performance/Custom : OE Spec Surface Finish : Polished, Rust Protected Quantity : 8 Pcs Kit Parts Included : Ball Joint, Outer Tie Rod, Inner Tie Rod, Sway Bar Cross Part Number : 5072445AA, 52128521AA 5072444AA, 52128520AA Cross part number : 5069161AA, 5069161AB, 5110437AA,52109970AA, 52088662AB Features : Greasable Finish : Coated Material : Alloy Steel Mounting Style : Bolt-On Cotter Pin Hole : Yes Payment Payments are expected within 7 days after the last winning auction is closed; Otherwise Unpaid Item Dispute will be filed with eBay. Shipping Product will be shipped within 2 business days after full payment is received and verified. Delivery Time is about 3-7 business days to most of countries. All domestic orders will be shipped via USPS, UPS or FedEx from our US warehouse and usually arrives to your door in about 3-5 business days. We ship the package to your shipping address in eBay instead of the one in PayPal. Please tell us your shipping address if it is different from the one in eBay. The tracking number will be given for the customer to check the shipping status online (registered or faster service only). We are not responsible for any wrong or undeliverable addresses. Please verify and update your shipping address on eBay during checkout. Returns MoneyBackOrExchange We stand behind every product we sell. All of our brand new items come with a 30-Days money-back guarantee. We define the item as defective only if it doesn't function as described. It is the buyer's responsibility to understand the item description before bidding. Contact Us We are dedicated to provide high quality products and satisfied customer service to our sincerely customers, so if there's any questions or problems with our products or service, feel free to contact us please. All rights reserved.